学校の課題でJavaとSwingでお絵かきソフトを作らないといけないのですが,今まで全然使いこなせていなかったGitHubを利用していきたい...
ちなみにGitは以前に勉強したことがあります.

GitHub実践入門 ~Pull Requestによる開発の変革 (WEB+DB PRESS plus)
- 作者: 大塚弘記
- 出版社/メーカー: 技術評論社
- 発売日: 2014/03/20
- メディア: 単行本(ソフトカバー)
- この商品を含むブログ (23件) を見る
GitHubとは
gitのプロジェクトを置いておくホスティングサービス。プロジェクトのソースコードやそこに使われてる画像ファイルなどを置いておく倉庫のようなものです。
こちら(非エンジニアもGithubを使うべき12の理由)のページなんかも,GitHubの重要性がまとめられていました。
↑のサイトの中でも,特に「Githubのサイトを見るだけで、開発用語を覚えられる」というのはとても大きなメリットだと思います。
開発準備
1. リポジトリの作成

GitHubのページ右上のNewRepositoryを選択。

- Repository name -> 好きな名前を入力
- Description -> リポジトリの説明を記入(空白でも可)。
- Public, Private -> 無料アカウントはリポジトリを非公開に出来ないのでPrivate
- Initialize this repository with a READ ME -> READMEファイルを自動的に作成.
- .gitignoreの作成 -> 特に今は必要ないのでnoneのまま
Create Repositoryでリポジトリの作成完了!
2. 作成したリポジトリを手元のマシンにcloneする
作成したリポジトリのcloneを手元の開発環境に持ってくる。

リポジトリのページの右下にリポジトリをcloneする際に指定するurlがあるので,copy clipboardでコピー。
$ git clone git@github.com:mejiro/JavaPaint.git
Cloning into 'JavaPaint'...
Permission denied (publickey).
fatal: Could not read from remote repository.

Please make sure you have the correct access rights
and the repository exists.
公開鍵の登録に何か問題があるようなので登録し直す。
$ ssh-keygen -t rsa -C "hogegmail.com"
$ cat ~/.ssh/id_rsa.pub
........
catコマンドの結果を全部コピーして,GitHubの「Settings>SSH KEYS>Add SSH key」に貼り付け. 登録してるメールアドレスにメールが届いたら↓のコマンドを実行
$ ssh -T git@github.com
Saving password to keychain failed
Identity added: /Users/masashi/.ssh/id_rsa (/Users/masashi/.ssh/id_rsa)
Hi mejiro! You've successfully authenticated, but GitHub does not provide shell access.
もう一度clone
$ git clone git@github.com:mejiro/JavaPaint.git
Cloning into 'JavaPaint'...
remote: Counting objects: 3, done.
remote: Compressing objects: 100% (2/2), done.
remote: Total 3 (delta 0), reused 0 (delta 0)
Receiving objects: 100% (3/3), done.
Checking connectivity... done
成功!
フォルダができているので移動する。
$ cd JavaPaint
コーディング
いよいよソースコードを書いていく. Gitは以前に勉強したことがあるので,わからないコマンドを見ながらその時にメモした記事を見ながら書いていく.
.gitignoreの設定
まずはコミットに含めないクラスファイルと画像ファイルを.gitignoreに記述.
$ vim .gitignore
$ cat .gitignore
*.class
./img/*.png
よく使うgitコマンド
- git add ファイル名
- git add -u
- git add -A
- git add .
- git rm ファイル名
- git commit -m "メッセージ"
- git push
- git log --oneline
- git log --stat
id:Furu222さんのコマンド一覧の記事がとても参考になりました。 僕もgitコマンドの早見表を作っていたのですが,それより全然見やすいです...
間違ってGitHubにpushしちゃっときの対処
間違ってcommitしてしまった時は
$ git reset --hard HEAD^
もしくは
$ git reset --hard 戻りたいコミットID
とすればcommitする前の状態に戻ることができます。 でもpushしちゃったら、手元のマシンで勝手に戻ってもpushがrejectされます。 そんな時は共有リポジトリの方もgit resetしちゃえばいい。
$ git push -f origin HEAD^:master
するとpush出来るようになります。
git pullでエラーになった時
githubにあるリポジトリを「違うマシンにclone」→「編集、コミット」→「GitHubにpush」したら,自分のマシンにもその変更を反映しないといけない。
でもこの時に自分のリポジトリにも変更していたら,pullに失敗する。 そんな時の対処は2通り。
- 自分のリポジトリの変更を取り消す。
$ git reset --hard
$ git pull origin
とすると,自分のリポジトリ上での変更を取り消しマージできる。この方法は簡単だけど自分のリポジトリの変更を消してしまうことになる。
- git commit -aしてからマージ→衝突の修正
$ git commit -a
$ git merge FETCH_HEAD
Auto-merging README.md
CONFLICT (content): Merge conflict in README.md
Automatic merge failed; fix conflicts and then commit the result.
$ git status
# On branch master
# Your branch and 'origin/master' have diverged,
# and have 1 and 1 different commit each, respectively.
#   (use "git pull" to merge the remote branch into yours)
#
# You have unmerged paths.
#   (fix conflicts and run "git commit")
#
# Unmerged paths:
#   (use "git add <file>..." to mark resolution)
#
#   both modified:      README.md
#
$ vim README.md
いらないところを消したり,修正。
$ git add -A
$ git commit -m "conflict fixed"
$ git push origin master
これで解決!!
とてもわかり易かったサイト↓
ローカルで作成したbranchをGitHubにpushする
まずはローカルにbranchの作成
$ git feature
$ git checkout feature
$ git branch
* feature
  master
featureブランチで色々ソースを書き換え...
キリがいいところまできたのでGitHubにpushする
$ git add -A
$ git commit -m "sepalate class"
$ git push origin feature
Saving password to keychain failed
Identity added: /Users/masashi/.ssh/id_rsa (/Users/masashi/.ssh/id_rsa)
Counting objects: 6, done.
Delta compression using up to 4 threads.
Compressing objects: 100% (4/4), done.
Writing objects: 100% (4/4), 1000 bytes | 0 bytes/s, done.
Total 4 (delta 2), reused 0 (delta 0)
To git@github.com:mejiro/JavaPaint.git
 * [new branch]      feature -> feature
$ git branch -a
* feature
  master
  remotes/origin/HEAD -> origin/master
  remotes/origin/feature
  remotes/origin/master
remoteにもfeatureブランチが出来ている!
git commit --amendしたらpushできなくなった。
$ git push origin feature
Warning: Permanently added the RSA host key for IP address '192.30.252.128' to the list of known hosts.
To git@github.com:mejiro/JavaPaint.git
 ! [rejected]        feature -> feature (non-fast-forward)
error: failed to push some refs to 'git@github.com:mejiro/JavaPaint.git'
hint: Updates were rejected because the tip of your current branch is behind
hint: its remote counterpart. Merge the remote changes (e.g. 'git pull')
hint: before pushing again.
hint: See the 'Note about fast-forwards' in 'git push --help' for details.
こんな時はとりあえずfetch
$ git fetch
$ git branch -a
* feature
  master
  remotes/origin/HEAD -> origin/master
  remotes/origin/feature
  remotes/origin/master
$ git diff FETCH_HEAD
リモートリポジトリとの差分を確認
$ git merge FETCH_HEAD
$ git push origin feature
解決!
ファイルを追加したりしたけど,取り消したい
あるライブラリとかを作業用フォルダに入れて,使おうとしたけどやっぱりやめようとしたら,git resetしても追加したライブラリのファイルやフォルダが消えない...
git resetしたのにgit statusするとさっき追加したライブラリのファイルやフォルダが表示される。
原因はまだgit addやgit commitをしていないためにさっき追加したライブラリ等がgitの管理対象に含まれていないこと.
そんなときはgit cleanコマンドでいいらしい。こちらを参考に↓のコマンドで解決しました。
$ git clean -n
削除されるファイルの一覧が表示される
$ git clean -f
$ git clean -d -n
削除するフォルダが表示される
$ git clean -d -f
確認してみると追加前の状態に戻っている
$ git diff
$ git status
# On branch feature
nothing to commit, working directory clean
Pull Requestの送信
この記事は,WEB+DB PRESS Vol.69のGitHub特集にのっている,「はじめてのPull Request」を見ながら勉強しています。 これは実際にWEB+DB PRESSさんが用意してくれたGitHubのリポジトリにPull Requestを送信するなどして実践的な練習が出来るものとなっています。
詳しくはこちら↓

- 作者: 大塚弘記,渡辺修司,堤智代,森田創,中島聡,A-Listers,はまちや2,川添貴生,井上誠一郎,近藤宇智朗,ヒノケン,後藤秀宣,佐藤鉄平,mala,奥野幹也,伊藤智章,WEB+DB PRESS編集部
- 出版社/メーカー: 技術評論社
- 発売日: 2012/06/23
- メディア: 大型本
- 購入: 13人 クリック: 143回
- この商品を含むブログ (18件) を見る
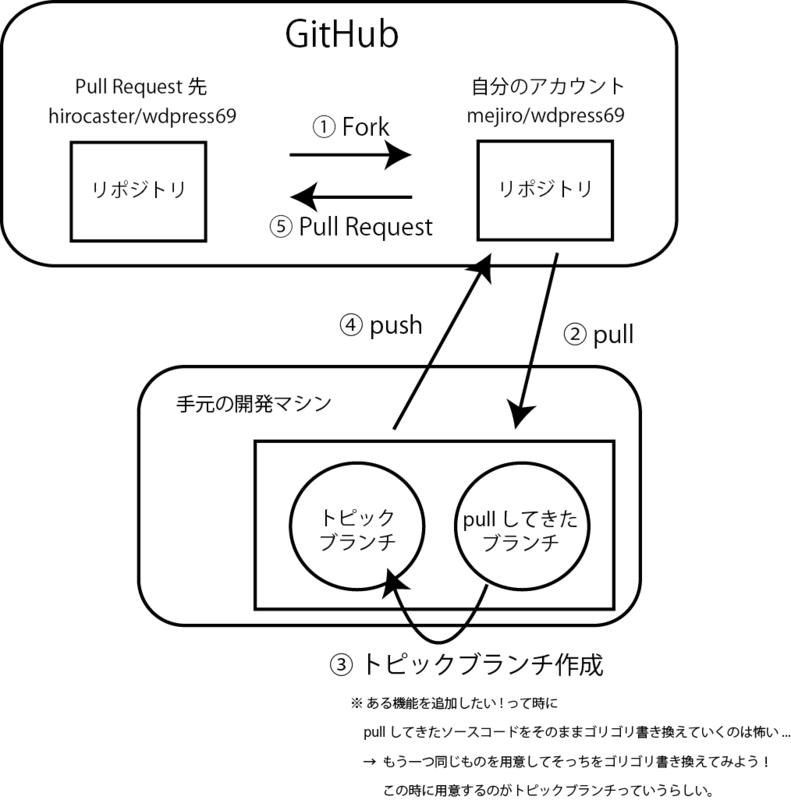
Pull Requestの送信は↓のようなイメージらしい。

① Fork

ページ右上に「Fork」と書かれたボタンが有る。GitHubにログインした状態でそれを押すと、自分のアカウントにリポジトリがForkされる。
② pull
リポジトリを手元の開発環境にcloneする。 画面右下にある「SSH clone URL」をコピー

$ git clone git@github.com:mejiro/wdpress69.git
③ トピックブランチを作成。
git branchコマンドでブランチの一覧を表示
$ cd wdpress69
$ git branch -a
* gh-pages
  remotes/origin/HEAD -> origin/gh-pages
  remotes/origin/fix-typo
  remotes/origin/gh-pages
現在gh-pagesというブランチだけがある状態のようです.
ここでworkというブランチを作成
$ git checkout -b work origin/gh-pages
Branch work set up to track remote branch gh-pages from origin.
Switched to a new branch 'work'
$ git branch -a
  gh-pages
* work
  remotes/origin/HEAD -> origin/gh-pages
  remotes/origin/fix-typo
  remotes/origin/gh-pages
③' 変更を加える
index.htmlをエディタで開いて,感想をHTML形式で追加。
他の方々の感想の後ろに僕の感想も追記しました。
<p class="impression">とても勉強になりました。ありがとうございます</p>
ブラウザでレイアウトが崩れていないか確認.
④ push
まずはコミット
$ git add index.html
$ git commit -m "Add my impression"
次は自分の変更を加えたworkブランチをpush
$ git push origin work
Counting objects: 5, done.
Compressing objects: 100% (3/3), done.
Writing objects: 100% (3/3), 312 bytes, done.
Total 3 (delta 2), reused 0 (delta 0)
To git@github.com:mejiro/wdpress69.git
 * [new branch]      work -> work
リモートのブランチを見てみると
$ git branch -a
  gh-pages
* work
  remotes/origin/HEAD -> origin/gh-pages
  remotes/origin/fix-typo
  remotes/origin/gh-pages
  remotes/origin/work
originにworkブランチが存在することが分かる。
⑤ Pull Request
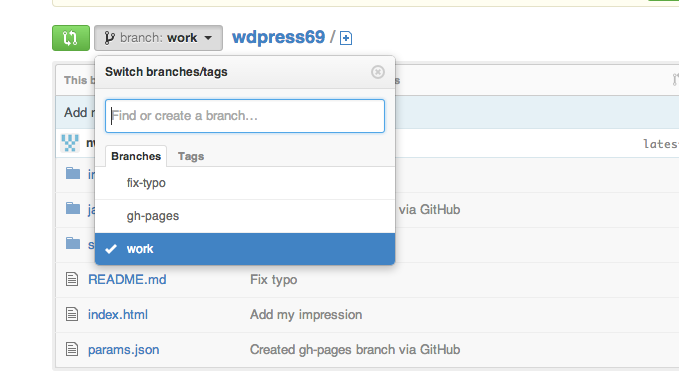
Pull Requestはgithubのページで行います。 ブラウザでリポジトリを開き,先程作成したworkブランチを選択。

Compare & pull requestを選択

コメントを書き込んで,「Send Pull Request」ボタンを押すとPull Request完了!

おまけ
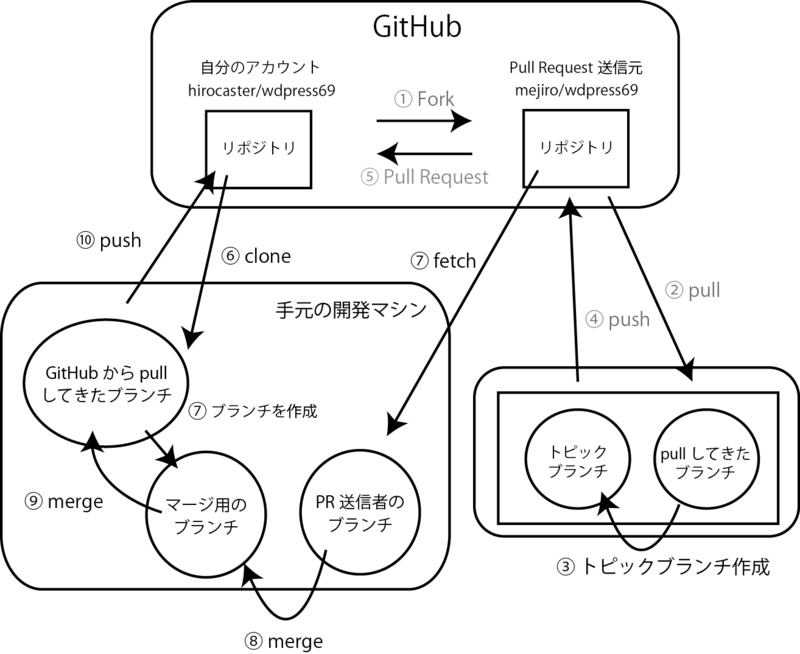
Pull Requestを取り込む際の流れのイメージもついでにつくったので張っておきます

図が下手なのでかなり複雑に見えますが,そんなに難しくは無さそうです。
感想
今までGitはそれなりに使っていたかと思っていたのですが,今回の勉強でgit addコマンドの意味がようやくわかってきた気がします。
ちなみにまだまだ作成中ですが,プログラムのソースコードはこちら↓です。